Saturday, December 31, 2011
Sunday, September 25, 2011
Japanese Circles
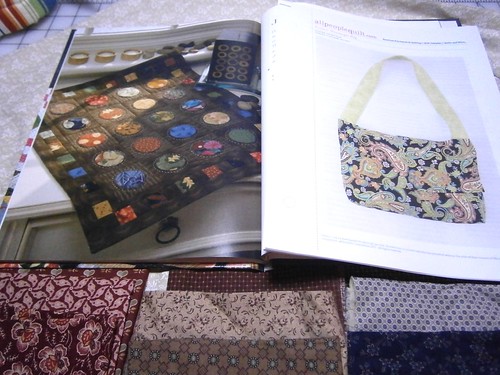
You know what I love about being able to make my own stuff? How ridiculously personalized I can make it. I can make something that suits me perfectly.
In this case, I'm making a messenger bag (the photo/pattern on the right), but instead of making the bag I found a pattern for, I'm going to change a few things. Namely, I'm making a mini quilt for the outside instead of using a patterned fabric.
It's not as complicated as it sounds...particularly in this instance when the measurements match exactly (how convenient!) with the quilt squares. There are a lot more OF them, but I am madly in love with this mini quilt pattern and have been for quite some time. My problem has been that I like practical things, and a mini quilt, while beautiful and decorative, isn't really practical. A potholder would be too small, and I knit and crochet so trust me when I say I have an abundance of potholders.
I love bags. I have tons of them in various shapes and sizes with varying numbers of pockets. I use them to store all the supplies I'll need for an individual project so I can grab-and-go, which I've likely mentioned before. When you're a "rabid" crafter...crafting constantly is kind of what you do and what better way to kill some time than by crafting while waiting?
I'll also be adding more pockets to the inside of the bag to hold all my smaller supplies for whatever projects will go in the bag.
As for the fabrics I'll be using...well...
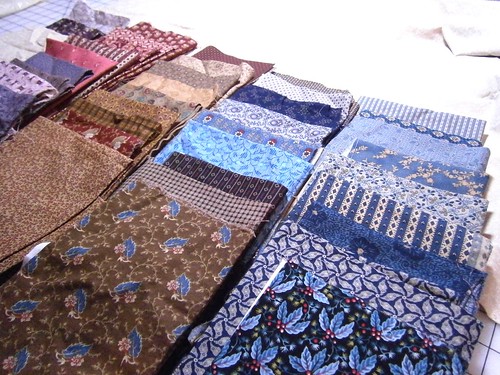
I've got some Civil War Era reproduction quilting fabrics I've been dying to find the perfect project for, and what better project than one I can take with me?
A project to hold projects. I love it when crafting goes meta :D
Saturday, September 24, 2011
Is it Fall already?
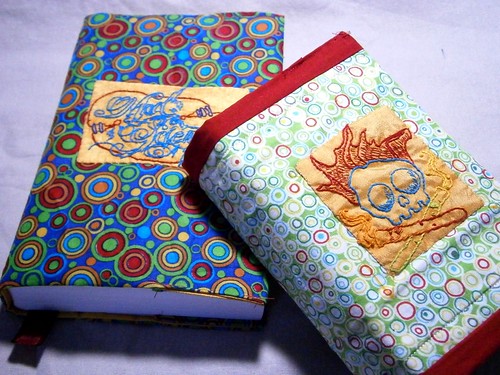
I've managed to get nothing done for National Sewing Month. This picture, like the cake, is a lie. I actually got these book covers done LAST month, and am just getting around to sharing them. So what am I doing this month instead?
**sigh**
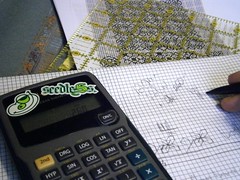
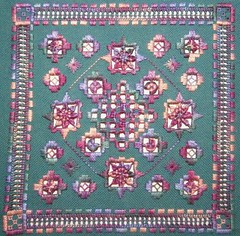
I'm getting really sick of looking at graph paper. I'm designing hardanger patterns because I have the stitching bug and not the sewing bug. On the plus side, I've made progress. On the downside, it's mixed progress...
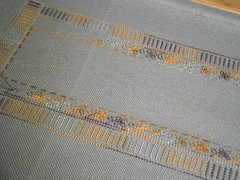
I made this pattern, and then borked it. I'm sure it'll be reappearing at some point as something else, but I tried an outer border (after trying 5 different ones) and the results were not what I anticipated, and I've already cut so I can't undo it. I'm sure the pieces of it will be recycled into something else but if you're eager to try it, let me know and I'll try to get it into pattern form faster.
On the plus side, I DID get this done, and the pattern and the finished piece itself are both listed in my etsy store.
Do you read my blog? A winner is you! Get 20% off anything in my store through October with the code: RABIDBLOGGER :) You should probably tell your friends though because I'm too busy reading quilting books for an upcoming fall project to track them all down.
In the works?


I'm tackling fall crafts because I live in Michigan and it's cold here. I've moved and have a room just for sewing and quilting, so the machines are in good working order and I'm perusing fall fabrics to inject a bit of steampunk into my wardrobe, and I'm in the middle of donating yards and yards of Waverly fabric for my rabbit to shed on and devour because he's too special to walk on hardwood floors and I have to make a rug. A dry clean only rug. Logic was not my strong suit in this endeavor.
Saturday, September 3, 2011
National Sewing Month?
I'm excited! I have tons of projects I can work on/finish. I guess I'll have to stop crocheting til October...just as soon as I finish this potholder, and this afghan, and...
Friday, November 19, 2010
Work complete!
You know...I think it took less time to design and stitch the pattern than it did to clean it up for publication and put everything together, but...

The pattern for the design I made for Valdani is finally published and now you can stitch it too!
I'm feeling rather accomplished, considering that it seems like so small a thing to get it put together and listed.
Go get it!
The pattern for the design I made for Valdani is finally published and now you can stitch it too!
I'm feeling rather accomplished, considering that it seems like so small a thing to get it put together and listed.
Go get it!
Thursday, November 18, 2010

Wednesday, November 17, 2010
Typhoid Mary up in here.
Okay so I've had a cold since the end of October...of last year. It's not the same cold. It was swine flu and the regular flu and a sinus infection and then another cold and another one and perhaps allergies that I'd never had before but really some terrible sinusitis something or other that never seems to end. I've started referring to myself as Plaguebearer and Typhoid Mary because all the people who work at the company that makes Nyquil? Huge Xmas bonuses this year thanks to how much Nyquil I've been taking for the past year. Thank goodness I can actually stay awake and function on Nyquil because otherwise I'd also be referring to myself as Rip Van Winkle. I hate Nyquil so much at this point that I'm now back to tactics of childhood to avoid taking it. I'm all better! I'll take it later. I'll take it after I destroy all my tastebuds so I don't have to taste something that awful all the way up to my eyeballs any more. MOM NOOOOOOOO!!!!!! I've been through the entire cold and flu aisle trying to find ANYTHING else that works, and I now have nasal steroids (that don't work) and an inhaler (which I'll defend to the death if someone tries to take it) as my new best friends.
I've been sick so long I don't even complain about being sick any more. I thought that was impossible. Instead I complain that I can't leave the house because I'll just get something else atop what I already have. I feel like that kid at school who never gets to play with all the other kids because they're too sickly and all the other kids make fun of them, and the doctors I've seen so far have been more disappointing than helpful. I quit smoking, which didn't help. I started smoking again, which didn't make it worse. I'm a hopeless mess at this point.
All of that is to say: I don't post much because I spend much of my time blinking slowly thanks to the Nyquil I have to take to breathe. And crocheting. Seriously.

That's only the first of two afghans I've been tearing through.
Since I'm spending so much time in the house, I've started focusing more on proper storage solutions and organization, and making it a nicer, more functional place to live.
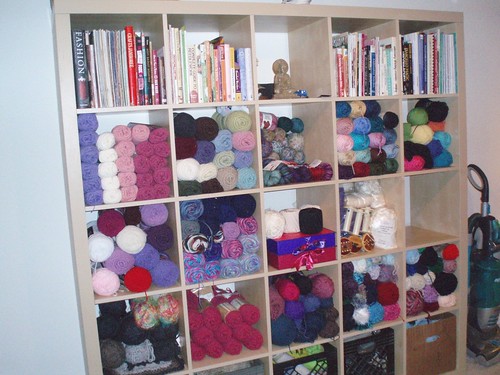
The bookcase is from IKEA, and it's perfect for yarn storage. I debated between my fabrics and my yarn, but I have so many fabric scraps that wouldn't look nice if stored this way that I decided to go with yarn storage. Emptied out a bookcase and 3 large plastic storage tubs that were taking up space for something that displays my yarns in an accessible way, and I just love it. My craft room looks like a yarn shop, and I'm looking forward to finding the perfect solutions for other areas of the room. I still have to get the drawers for the bottom row. I can't put yarn on the bottom row because Chuck would think it was Christmas.
Pets are fun :)
Today I'm getting one of my long-term goals completed. In like an hour, an antique treadle sewing machine is being delivered. I'm not sure where I'm going to put it yet for it to be a functional display piece, but since I don't have to plug it in anywhere, my options increase drastically.
I'm really excited about the machine. I've wanted one for years, and while I haven't seen this one yet, I have it on good authority that it's functional, well maintained, and comes with tons of accessories. There will be photos, and while the cost wasn't unreasonable, the joy it will bring me for years is likely to make any cost an utter steal.
My grandmother (a quilter) found it in a local antique shop she sometimes works in. It's from a local museum. She knows how bad I've wanted one and contacted me straight away to give me the heads up. I'm unbelievably excited and she's excited for me, which is always fun. I'm sure we'll cause tons of trouble with it.
Causing trouble with my grandma usually involves finding great deals and/or quilting.
I have the best grandma ever.
I've been sick so long I don't even complain about being sick any more. I thought that was impossible. Instead I complain that I can't leave the house because I'll just get something else atop what I already have. I feel like that kid at school who never gets to play with all the other kids because they're too sickly and all the other kids make fun of them, and the doctors I've seen so far have been more disappointing than helpful. I quit smoking, which didn't help. I started smoking again, which didn't make it worse. I'm a hopeless mess at this point.
All of that is to say: I don't post much because I spend much of my time blinking slowly thanks to the Nyquil I have to take to breathe. And crocheting. Seriously.
That's only the first of two afghans I've been tearing through.
Since I'm spending so much time in the house, I've started focusing more on proper storage solutions and organization, and making it a nicer, more functional place to live.
The bookcase is from IKEA, and it's perfect for yarn storage. I debated between my fabrics and my yarn, but I have so many fabric scraps that wouldn't look nice if stored this way that I decided to go with yarn storage. Emptied out a bookcase and 3 large plastic storage tubs that were taking up space for something that displays my yarns in an accessible way, and I just love it. My craft room looks like a yarn shop, and I'm looking forward to finding the perfect solutions for other areas of the room. I still have to get the drawers for the bottom row. I can't put yarn on the bottom row because Chuck would think it was Christmas.
Pets are fun :)
Today I'm getting one of my long-term goals completed. In like an hour, an antique treadle sewing machine is being delivered. I'm not sure where I'm going to put it yet for it to be a functional display piece, but since I don't have to plug it in anywhere, my options increase drastically.
I'm really excited about the machine. I've wanted one for years, and while I haven't seen this one yet, I have it on good authority that it's functional, well maintained, and comes with tons of accessories. There will be photos, and while the cost wasn't unreasonable, the joy it will bring me for years is likely to make any cost an utter steal.
My grandmother (a quilter) found it in a local antique shop she sometimes works in. It's from a local museum. She knows how bad I've wanted one and contacted me straight away to give me the heads up. I'm unbelievably excited and she's excited for me, which is always fun. I'm sure we'll cause tons of trouble with it.
Causing trouble with my grandma usually involves finding great deals and/or quilting.
I have the best grandma ever.
Thursday, August 19, 2010
Upcoming tutorials...

I'm taking up ATCs (artist trading cards)...not so much for the trading aspect, but because using such a small canvas has a surprising number of advantages.

Okay maybe we're having a little TOO much fun. I invited a friend over and we each made one. Mine's the one on the left.
Other tutorials in the works:

Using a pattern from Urban Threads to make a cover for the giant book I'm using to catalogue my embroidery stitches. It's going to take a while to design the cover, put together the pattern, quilt it, embroider it, and then teach other people how, but it'll be so worth it when it's done.
Last but not least...

Did you know it's almost fall? I'm sorry to be the one to break the news. At least I'll be celebrating it with a centerpiece?
Wednesday, August 18, 2010
Craft Box Tutorial: Cluttertraps
Besides crafts, I have several things that I love. I love containers, especially containers that are small enough to hold the goods for one project (portability is key). I also love the ability to make things I couldn't otherwise make. I'm not really good at woodworking, for example, so I can't make boxes. As such, I don't like throwing things away that have already done those things for me easily, especially not when I could upcycle them into something more functional. I like working with things you were supposed to throw away because, if you mess up, you can still throw them away.
Since I just got this done and it's a fairly easy tutorial, I figured I'd share how I did it so you can make your own cluttertraps.
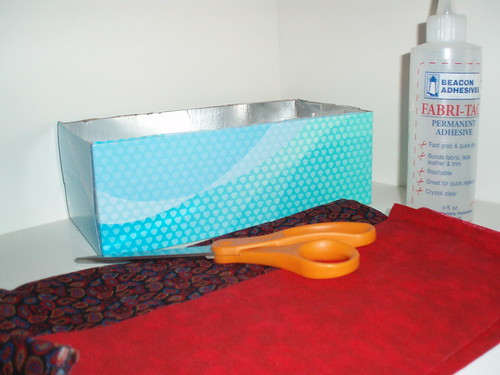
Supplies: Box (I cut the top off a kleenex box)
2 coordinating fabrics big enough to cover the box.
Fabri-tac or other fabric-friendly glue
Scissors
Toothpicks
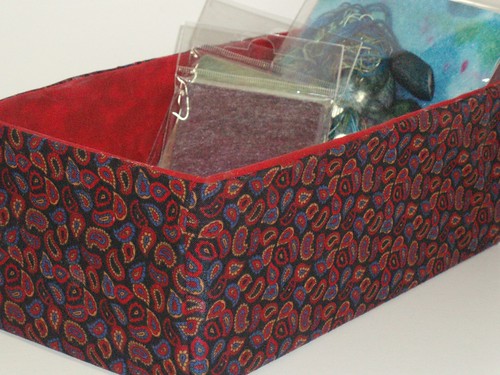
Pictures for a fabric covered box "cluttertrap" tutorial you can read all about on my blog!
Since this project was fairly easy and impromptu, I didn't do a lot of detailed photos. I mostly winged it.
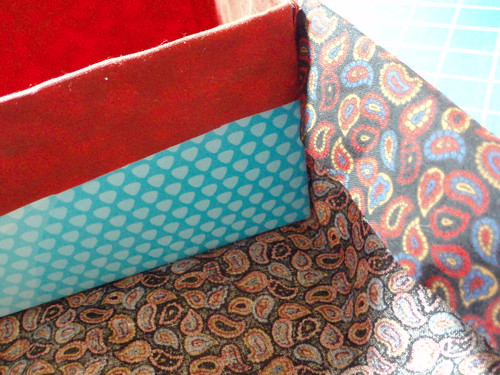
Lining your box:
I took a fat quarter (it was big enough) and centered it over the box, then glued the bottom in place, paying special attention to the corners. Because I used fabri-tac, it didn't take long to dry. Then I was ready for the next step.
I cut one edge (for the inside only) flush with the corner, and the other edge about 1/2" past the corner. Then I cut the top edge about an inch or so past the top of the box. I did this with each of my sides. The one edge that curls around to the next side is so that no silver (or whatever color the interior of your box is) shows through when you line your box.
The trickiest parts to glue will be where your 1st and 4th side meet. To make it easier, apply glue to the inside of the side you're going to tack down starting about an inch away from the corner with the flush fabric edge. Also add a stripe of glue to tack down the half inch that folds around the corner to side two. Glue side one in place (remembering that the side that meets with the corner won't be tacked down) and smooth it out before the glue dries. Do this with sides two and 3, gluing down the entire side (instead of leaving the 1 inch space unglued). The trickiest part of side 4 will be where you have to tuck the edge of the fabric under side 1 (which is why you left it unglued). The rest of the lining should go on smoothly.
If you're having problems getting the edge fabric from side 4 under the fabric from side 1, you can use the edge of your scissors or a toothpick to tuck it underneath.
Once your sides are done, you can fold the lining over the top edge and glue it in place on the outside of your box.
Fabric shell for your box:
Now it's time for the outside.
I cut a piece of fabric that would be large enough to cover my entire box (adding about 2 inches to the final cut size for seam allowances). I then glued the box down in the center of the fabric.
Once it dried, I started bringing my fabric up the sides, folding under the fabric at the top and lining up my fabric/box top edges.
I did a little creative cutwork here to shorten the extra fabric that I knew I'd have on some of the sides, and a lot of creative folding. How I did it is fairly simple. The important thing is that your end product (the corner) should look like this.
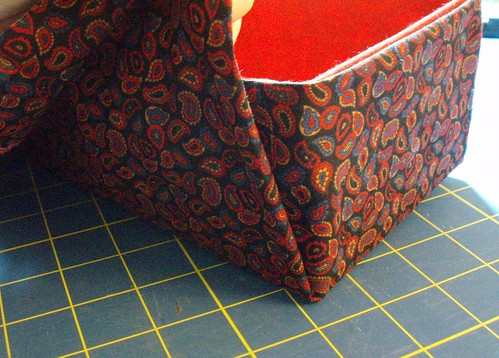
To properly glue down the corners (and have them line up properly)...
You'll want to glue down over the bottom layer of fabric inside that triangle.
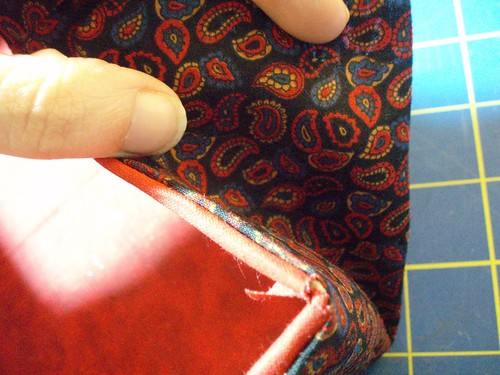
Once you get your outside tacked down and smoothed out properly, you might notice that the fabric gaps a bit because (to keep the glue from smooshing out and ruining your fabric) you glued a bit away from the edge.
Easy fix!
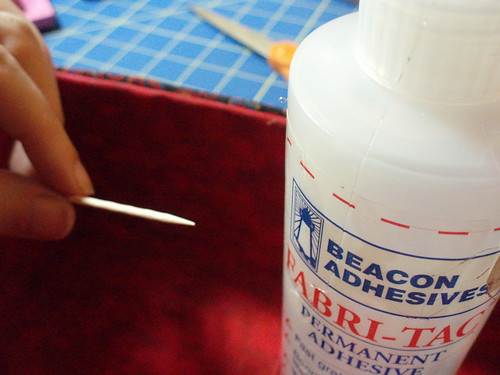
Use the toothpicks to grab up some glue so you can apply it more precisely and seal up your edges.
If you used fabri-tac, it'll dry in a couple of minutes and you can start loading it with stuff.
When you see how easy it was, you'll want to make oodles in tons of different sizes. I'm trying my hardest not to start digging through my stash of shipping boxes to 'fix' them.
If you're looking for other craft ideas, you might want to check out the article I did last month listing some of the best new craft project ideas on the web. Some of mine are there, too, just in case you haven't had enough of my kamikaze crafting style.
Happy crafting!
Thursday, August 12, 2010
Zombie Fight Club and Other Crafts for Kids
I should totally make the post title an actual book. For kids. No? Don't crush my dreams!
Why the talk about Zombie Fight club? Well...
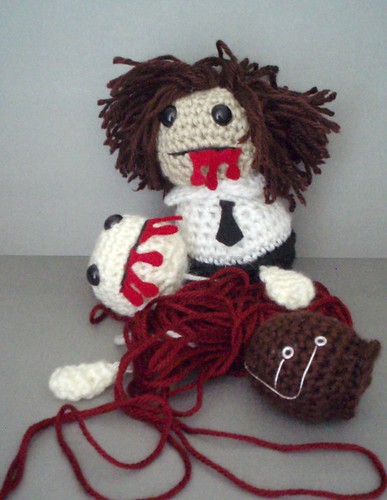
It all started, as the best stories do, when I was hurrying through making presents for someone's birthday party I was going to be attending in a few hours (Yes, they appreciated the zombies actually. I know some spectacular people!). I finally got the peices done for the 2nd zombie but I was feeling a bit of animosity towards the hair I was making for him (not part of the original pattern) and as I looked at all his bits I had a terrible, awful idea.
So, I had corporate zombie eat him. Problem solved.
I tweeted it. The owner of the book I got the patterns from was amused. They were amused at knithacker.com and actually blogged about it, then it got tweeted everywhere. Meanwhile...
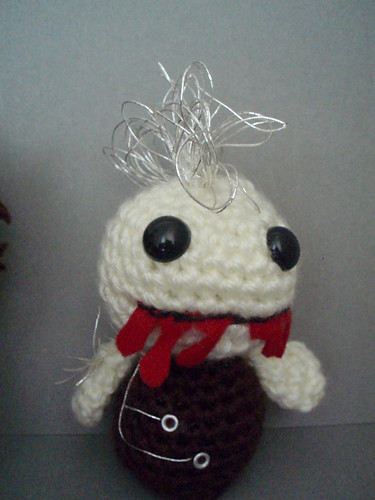
I was busy putting a wire mohawk on him, wrapping them separately in their packaging (putting an end to the fighting) and going to a birthday gathering.
How do crafts for kids get involved in this mess?
Fortunately for all of us, they're separate.

Yesterday, a tutorial was published telling people how to make this handy (and cute!) organizer to hold pencils, paintbrushes, or whatever else your heart desires. Want one? The tutorial is right here! And, there are more pics if you need help on my flickr.
I've not gotten much of a chance to publish (or blog) lately because I've been working so hard at getting my company off the ground. I'm surprisingly close! The finish line is in sight so I'm trying really hard to pull everything together for the launch. Got some great ideas coming through and I can't wait to unveil my kits. They'll be going to my Etsy store but if you're a shop (or you know a shop and would like them to carry my kits) or a teacher, you can contact me for discounts once my product is launched so stay tuned for that upcoming information! I can hardly believe it's finally coming together! It's nice when plans come to fruition.
Why the talk about Zombie Fight club? Well...
It all started, as the best stories do, when I was hurrying through making presents for someone's birthday party I was going to be attending in a few hours (Yes, they appreciated the zombies actually. I know some spectacular people!). I finally got the peices done for the 2nd zombie but I was feeling a bit of animosity towards the hair I was making for him (not part of the original pattern) and as I looked at all his bits I had a terrible, awful idea.
So, I had corporate zombie eat him. Problem solved.
I tweeted it. The owner of the book I got the patterns from was amused. They were amused at knithacker.com and actually blogged about it, then it got tweeted everywhere. Meanwhile...
I was busy putting a wire mohawk on him, wrapping them separately in their packaging (putting an end to the fighting) and going to a birthday gathering.
How do crafts for kids get involved in this mess?
Fortunately for all of us, they're separate.
Yesterday, a tutorial was published telling people how to make this handy (and cute!) organizer to hold pencils, paintbrushes, or whatever else your heart desires. Want one? The tutorial is right here! And, there are more pics if you need help on my flickr.
I've not gotten much of a chance to publish (or blog) lately because I've been working so hard at getting my company off the ground. I'm surprisingly close! The finish line is in sight so I'm trying really hard to pull everything together for the launch. Got some great ideas coming through and I can't wait to unveil my kits. They'll be going to my Etsy store but if you're a shop (or you know a shop and would like them to carry my kits) or a teacher, you can contact me for discounts once my product is launched so stay tuned for that upcoming information! I can hardly believe it's finally coming together! It's nice when plans come to fruition.
Subscribe to:
Posts (Atom)